|
|
Post by shadowscall on Apr 11, 2012 22:43:53 GMT -7
If someone is a redstone expert and can help me with this, I will love you long time:). I don't know how to put a save file up for someone else to use so I will try a picture. If this makes you completely lost and you need a save game then just tell me how I do that and I will. I am trying to make a bridge, I can make it 2 wide if needed, I know how to do that, but I would like it to be 3 wide. I can get the outside pistons to work but not the very middle one. Diagram follows. WP=piston that works, NP=piston that doesn't work.
WPWPWP
WPNPWP
WPWPWP
Also, if I could have the wiring hidden that would be nice. Oh, and I want to be able to flip a lever on one side to bring the bridge up, then cross and hit a lever on the other side to lower it back down. If that is possible. This is on Single Player so it doesn't have to be thief-proof. Like I said, I could reduce it to 2 wide and then I could make all the pistons work but I would prefer 3 wide. Even with 2 wide though, I do not know how to make it raise when I hit a lever on one side then lower when I hit the lever on the opposite side.
|
|
|
|
Post by Vega Sera on Apr 12, 2012 1:07:53 GMT -7
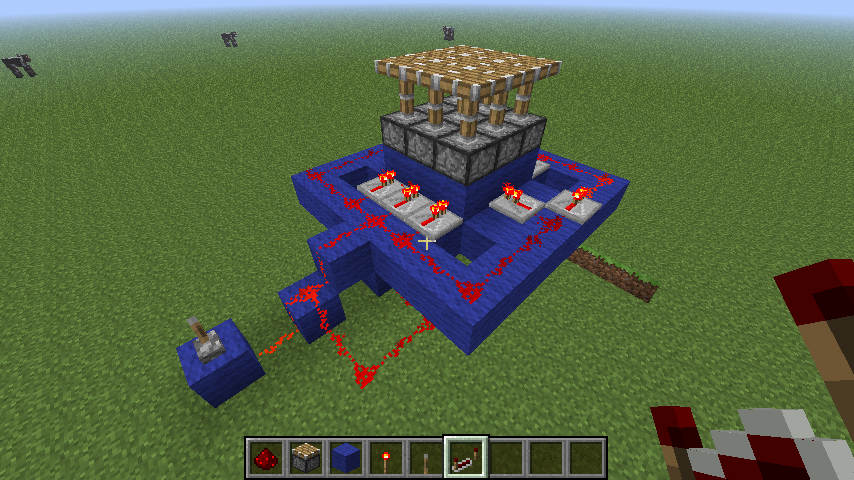 In this first image, you see it working. The whole point is that I have 8 repeaters powering the 8 pistons on the outside, but the central piston must be powered in another way. The redstone you see running underneath goes into two inverters as you'll see in this pic : 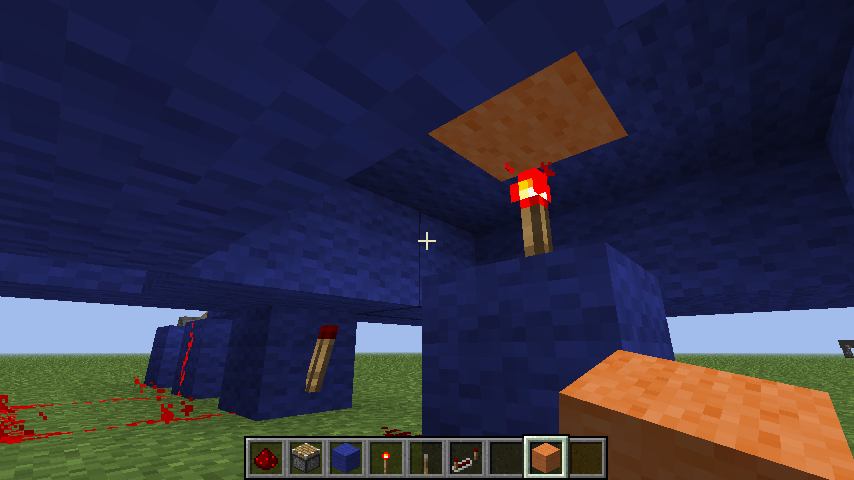 The reason there are two inverters is because you want the output to be the same as the output up top, however it must be able to transmit vertically, so using redstone dust alone couldn't do it. The orange block you see is the block directly under the central piston. 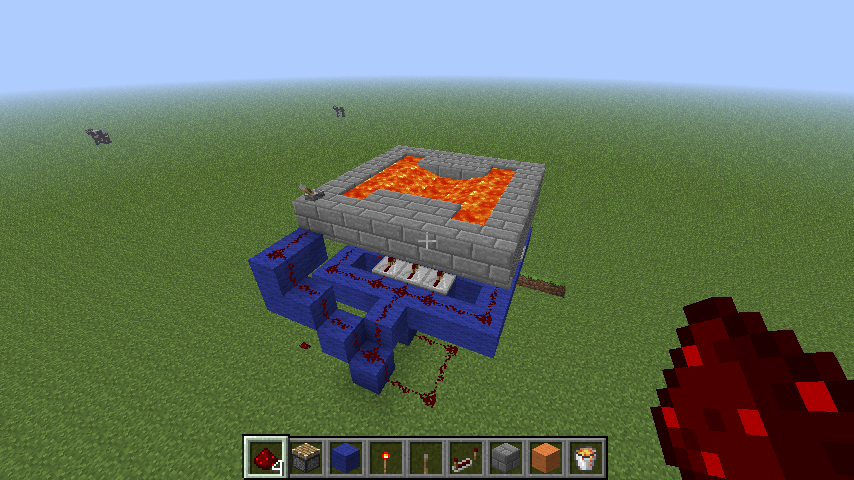 This one is to show how it could be covered and activated, obviously there would be walls or something else on the side, but it's not necessary just for demonstration purposes. When the lever is pulled, it raises the pistons and forms a piston bridge. And finally: 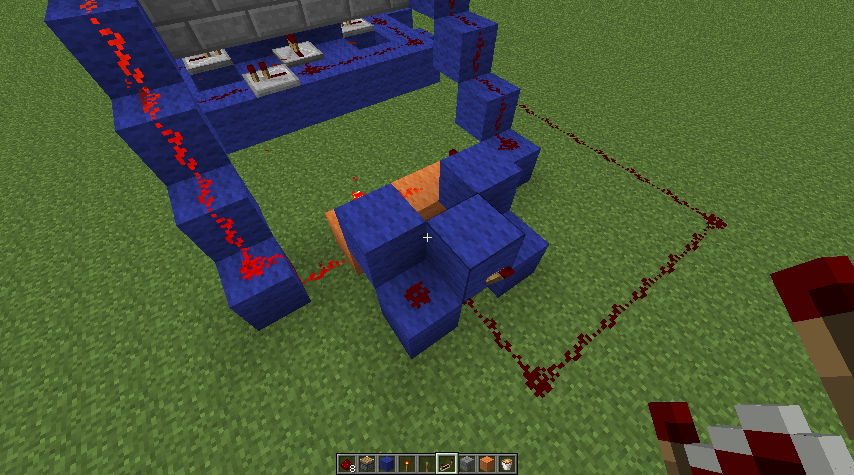 This shows how to use two levers to act as one. The logic gate you see here is an XNOR gate. Essentially if one input changes, then the output changes, this way you can use both levers to either engage or retract the bridge. Go to this link and look at letter A to see the design for the XNOR gate. www.minecraftwiki.net/images/thumb/a/af/XNOR_gate.png/655px-XNOR_gate.pngOf course you can wire this up in whatever way suits your needs, I just found this the easiest method. And if you need any help or advice with anything I've put here, feel free to ask. |
|
|
|
Post by Vega Sera on Apr 12, 2012 1:20:16 GMT -7
And here is the complete bridge in a room. Alternatively you could use sticky pistons with the same kind of blocks as the walkway in order to keep a certain style. 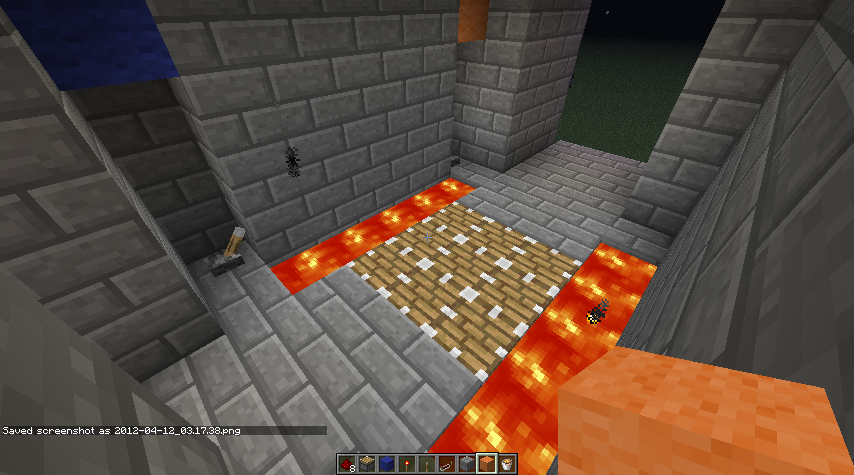 |
|
|
|
Post by shadowscall on Apr 12, 2012 9:08:03 GMT -7
I got all the pistons working, however I am still confused on the logic gate that lets you have a lever on each side that turns it on and off. If you could post screenshots that detail that I would appreciate it. The diagram in the link confused me. Thank you for the help.
|
|
|
|
Post by Vega Sera on Apr 12, 2012 11:16:56 GMT -7
Ah, right, I forget that the diagram isn't simple, sorry about that. Anytime you see a solid red line or cross, that's redstone dust. When you see a yellow block, that's any opaque block in the game you want to use. When you see a red dot with a line, that's a torch on the side of a block. Simply put the second part on top of the first. The letters A and B are your inputs, those are where the levers go into. The letter O is your output. Here is the first level of the XNOR gate. 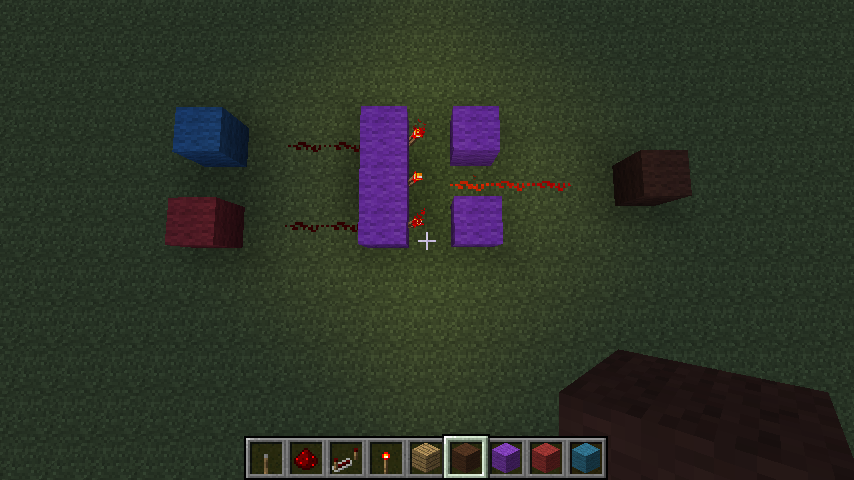 The blue block is where your first input is at, the red block is where your second input is at, the brown is your output, and the purple is any opaque block you want. (Try to refer back to the diagrams I linked earlier so you can see how it all is notated) 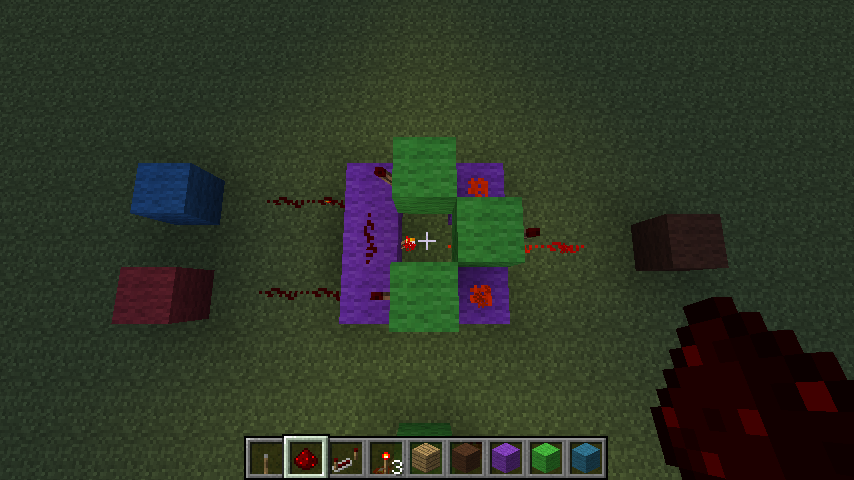 The green blocks are showing the blocks for the second level, but of course, it can be any block you want. Put two of the blocks over the row of torches as you see here, and one in the middle over the output line. Then you put a torch on each of the green blocks, two facing the inputs, and one facing the outputs. Then you simply have to place redstone dust in the space remaining to make it all work. |
|
|
|
Post by shadowscall on Apr 12, 2012 15:24:33 GMT -7
Thank you so much Vega, now my lava moat can become a reality. Now to install an emergency water pool inside my fort for when I inevitably fall into the lava and put myself on fire lol. +10 coolness points to you.
|
|
|
|
Post by CoconutCurry on Apr 12, 2012 17:01:02 GMT -7
Things like this are why I gave Vega a custom title.
|
|
|
|
Post by ldog on Apr 12, 2012 18:47:50 GMT -7
Yeah very nice screens Vega. I struggled for hours building my first XNOR (actually I was trying to do the same thing the OP was).
Alternatively if you use Redpower or Powercraft they have all in 1 logic gates. Build them, plop them down and hook wire up to them. Saves a ton of space.
|
|
|
|
Post by Vega Sera on Apr 12, 2012 23:03:20 GMT -7
I am glad that everyone approves  And while redpower is useful at times, it takes most of the fun out of redstone for me. |
|
|
|
Post by Peter on Apr 13, 2012 0:46:34 GMT -7
Redpower is definitely a space saver though  |
|